
Xin chào,
Trong bài này, tôi sẽ tiếp tục hoàn thành bài 13 với một hướng dẫn để trình bày cho bạn biết cách tạo một thực thể đơn giản, từng bước một. Thực thể này có một vài tính năng giúp bạn thấy được cái gì có thể xảy ra khi sử dụng ObjectARX.
Hãy đọc cẩn thận những chỉ dẫn sau đây.
Trong bài này, tôi sẽ tiếp tục hoàn thành bài 13 với một hướng dẫn để trình bày cho bạn biết cách tạo một thực thể đơn giản, từng bước một. Thực thể này có một vài tính năng giúp bạn thấy được cái gì có thể xảy ra khi sử dụng ObjectARX.
Hãy đọc cẩn thận những chỉ dẫn sau đây.
-Tạo một Giải pháp trống (Blank Solution) gọi là CustomEntitySample;
-Thêm một dự án DBX có tên CustEntityDBX;
-Thêm dự án ARX tên là CustEntityARX;
-Hãy nhớ bật mở rộng MFC trong cả hai dự án;
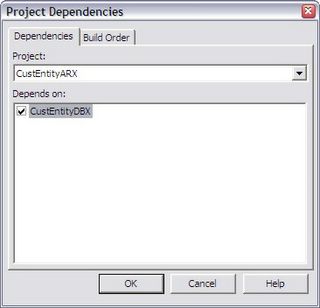
-Tạo một phụ thuộc (dependency) từ dự án ARX tới DBX:
-Thêm một dự án DBX có tên CustEntityDBX;
-Thêm dự án ARX tên là CustEntityARX;
-Hãy nhớ bật mở rộng MFC trong cả hai dự án;
-Tạo một phụ thuộc (dependency) từ dự án ARX tới DBX:
 |
| Tạo một phụ thuộc Dependency |
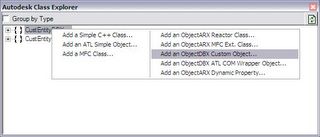
-Vào dự án DBX và mở Autodesk Class Explorer;
-Click chuột phải vào nhánh CustEntityDBX và chọn "Add ObjectDBX Custom Object...":
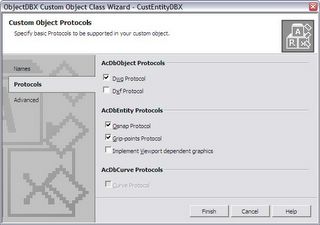
-Chọn tên lớp MyCustomEntity và dẫn xuất nó từ lớp AcDbEntity;
-Các thông tin khác sẽ được điền tự động (Bạn có thể thay đổi nếu muốn);

-Vào TAB Protocols và bật cả hai giao thức Osnap và Grip-points:
-Xây dựng lại Rebuild dự án nếu mọi việc hoàn thành;
-Bây giờ mở lại Autodesk Class Explorer, vào dự án CustEntityDBX;
-Chọn nhánh MyCustomEntity (nếu không nhìn thấy, click vào biểu tượng Refresh);
-Click chuột phải vào nó và chọn "Add Variable...":

-Đặt tên nó là "m_PtA", kiểu AcGePoint3d và kiểu truy suất là protected;
-Bật "Participate to DWG filing protocol" (tham gia giao thức điền DWG), Tắt "Increase Version number" (Tăng số hiệu phiên bản);
-Bật "Implement Get/Put methods" và điền ghi chú cần thiết;
-Lặp lại quá trình trên với các biến : "m_PtB", "m_PtAB" và "m_PtBA":

-Bây giờ, thêm một biến kiểu CString có tên "m_Text";
-Nhớ sửa chữa thao tác CString và điền đầy đủ như những gì ta đã làm trong Lab3;
-Bây giờ bạn đã có thể chạy biên dịch;

Trước khi tiếp tục, chúng ta cần loại bỏ vài hàm không sử dụng đến. Đầu tiên loại bỏ trong tệp tiêu đề Header (*.h):
Có 4 phương thức getOsnapPoints(). Chúng ta chỉ sử dụng một phương thức sau:
virtual Acad::ErrorStatus getGripPoints (
AcDbGripDataPtrArray &grips, const double curViewUnitSize, const int gripSize,
const AcGeVector3d &curViewDir, const int bitflags) const;
virtual Acad::ErrorStatus moveGripPointsAt (
const AcDbVoidPtrArray &gripAppData,
const AcGeVector3d &offset, const int bitflags);
virtual Acad::ErrorStatus getOsnapPoints (
AcDb::OsnapMode osnapMode,
int gsSelectionMark,
const AcGePoint3d &pickPoint,
const AcGePoint3d &lastPoint,
const AcGeMatrix3d &viewXform,
AcGePoint3dArray &snapPoints,
AcDbIntArray &geomIds) const ;
Nào, bạn sẽ cần xóa phần thân của các hàm trong tệp tin cpp.
WORLDDRAW
-Để vẽ thực thể custom entity, chúng ta cần thêm đoạn mã sau vào phương thức worldDraw():
assertReadEnabled();
// Bounding Polyline
AcGePoint3d pts[4];
pts[0] = m_PtA;
pts[1] = m_PtAB;
pts[2] = m_PtB;
pts[3] = m_PtBA;
mode->subEntityTraits().setSelectionMarker(1); // Mark 1
mode->subEntityTraits().setColor(1); // Red
mode->geometry().polygon(4,pts);
// Entity's Text
mode->subEntityTraits().setSelectionMarker(2); // Mark 2
mode->subEntityTraits().setColor(256); // ByLayer
AcGiTextStyle style;
style.setFileName(_T("txt.shx"));
style.setBigFontFileName(_T(""));
style.setTextSize(25);
style.loadStyleRec();
AcGePoint3d txtPt((m_PtB.x+m_PtA.x)/2.0, (m_PtB.y+m_PtA.y)/2.0, m_PtA.z);
mode->geometry().text(txtPt, AcGeVector3d::kZAxis,
(m_PtAB-m_PtA),m_Text, m_Text.GetLength(),Adesk::kFalse, style);
return Adesk::kTrue;
Các điểm GRIP
-Mở phương thức getGripPoints() bên trong thực thi MyCustomEntity (cpp);-Chúng ta sẽ bật 5 điểm grips cho thực thể. Các điểm góc (A,B,AB và BA) cộng với điểm ở tâm;
-Bên trong getGripPoints(), thêm đoạn mã sau:
gripPoints.append(m_PtA);-Bây giờ, khi người dùng click vào mỗi điểm Grip, chúng ta sẽ tiến hành các hành động tương ứng thông qua phương thức moveGripPointsAt();
gripPoints.append(m_PtAB);
gripPoints.append(m_PtB);
gripPoints.append(m_PtBA);
gripPoints.append(AcGePoint3d((m_PtB.x+m_PtA.x)/2.0,
(m_PtB.y+m_PtA.y)/2.0,m_PtA.z));
-Chúng ta cần phải kiểm tra chỉ số của mỗi điểm Grip được kích hoạt tương ứng với phương thức getGripPoints() và áp dụng các biến đổi cần thiết;
-Trong phương thức còn lại moveGripPointsAt(), thêm đoạn mã sau:
assertWriteEnabled();
for(int i=0; i<indices.length(); i++) {
int idx = indices.at(i);
// For A and center point
if (idx==0 idx==4) m_PtA += offset;
// For AB and center point
if (idx==1 idx==4) m_PtAB += offset;
// For B and center point
if (idx==2 idx==4) m_PtB += offset;
// For BA and center point
if (idx==3 idx==4) m_PtBA += offset;
}
return (Acad::eOk);
Các điểm OSNAP
-Mở phương thức getOsnapPoints(). Chúng ta sẽ thêm 3 điểm Osnap kiểu: EndPoint, MidPoint and Center:assertReadEnabled();
switch (osnapMode) {
case AcDb::kOsModeEnd:
snapPoints.append(m_PtA);
snapPoints.append(m_PtAB);
snapPoints.append(m_PtB);
snapPoints.append(m_PtBA);
break;
case AcDb::kOsModeMid:
snapPoints.append(m_PtA+((m_PtAB-m_PtA).length()/2.0)*((m_PtAB-m_PtA).normalize()));
snapPoints.append(m_PtAB+((m_PtB-m_PtAB).length()/2.0)*((m_PtB-m_PtAB).normalize()));
snapPoints.append(m_PtB+((m_PtBA-m_PtB).length()/2.0)*((m_PtBA-m_PtB).normalize()));
snapPoints.append(m_PtBA+((m_PtA-m_PtBA).length()/2.0)*((m_PtA-m_PtBA).normalize()));
break;
case AcDb::kOsModeCen:
snapPoints.append(AcGePoint3d((m_PtB.x+m_PtA.x)/2.0,
(m_PtB.y+m_PtA.y)/2.0, m_PtA.z));
break;
}
return (Acad::eOk);
BIẾN ĐỔI
-Thực thể biến đổi được thực hiện bởi phương thức transformBy();
-Mở Autodesk Class Explorer, mở rộng nhánh MyCustomEntity, -> nhánh Base Classes và sau cùng là nhánh AcDbEntity;
-Kéo danh sách xuống và lựa chọn:
Acad::ErrorStatus transformBy(const AcGeMatrix3d &);
-Click chuột phải trong phương thức này và chọn "Implement Base Class Method";
-Hàm logic này rất đơn giản, chỉ cần thêm đoạn mã sau:
-Hàm này sẽ cho phép thực thể có thể biến đổi được;
assertWriteEnabled();
m_PtA.transformBy(xform);
m_PtAB.transformBy(xform);
m_PtB.transformBy(xform);
m_PtBA.transformBy(xform);
return (Acad::eOk);
DỰ ÁN ARX
-Đầu tiên chúng ta sẽ thêm lệnh mới có tên "MyCustEnt";
-Nó sẽ tạo ra phương thức bên trong tệp acxrEntryPoint.cpp;
-Bây giờ, thêm chỉ thị cần cần thiết sau #include "StdAfx.h":
#include "..\CustEntityDBX\MyCustomEntity.h"-Trong phương thức, chúng ta sẽ tạo ra thực thể:
// Input information
ads_point pt1,pt2;
if (acedGetPoint(NULL,_T("Set the first point:\n"),pt1) != RTNORM)
return;
if (acedGetCorner(pt1,_T("Set the second point:\n"),pt2) != RTNORM)
return;
TCHAR buffer[512];
if (acedGetString(0,_T("Enter the text:\n"),buffer) != RTNORM)
return;
// Setup entity
MyCustomEntity *pEnt = new MyCustomEntity();
pEnt->put_m_PtA(asPnt3d(pt1));
pEnt->put_m_PtAB(AcGePoint3d(pt2[X],pt1[Y],pt1[Z]));
pEnt->put_m_PtB(asPnt3d(pt2));
pEnt->put_m_PtBA(AcGePoint3d(pt1[X],pt2[Y],pt2[Z]));
pEnt->put_m_Text(buffer);
// Post to Database
AcDbBlockTable *pBlockTable;
acdbHostApplicationServices()->workingDatabase()->getSymbolTable(pBlockTable,
AcDb::kForRead);
AcDbBlockTableRecord *pBlockTableRecord;
pBlockTable->getAt(ACDB_MODEL_SPACE, pBlockTableRecord,AcDb::kForWrite);
pBlockTable->close();
AcDbObjectId retId = AcDbObjectId::kNull;
pBlockTableRecord->appendAcDbEntity(retId, pEnt);
pBlockTableRecord->close();
pEnt->close();
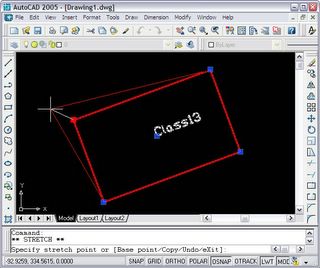
TEST
-Rebuild lại dự án;
-Mở AutoCAD và tải module DBX trước tiên rồi tải ARX;
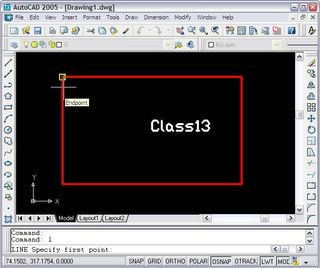
-Bắt đầu lệnh MYCUSTENT và tạo bao nhiêu thực thể bạn muốn;
-Kiểm tra nó thông qua chỉnh sửa GRIP, MOVE, ROTATE, SCALE;
-Thực hiện lệnh LINE và thử bắt điểm (EndPoint, MidPoint và Center) trên thực thể xem sao;
Link nguồn: Arxdummies


Không có nhận xét nào:
Đăng nhận xét